Le sildénafil présent dans Kamagra exerce une inhibition réversible de la PDE5, modulant la cascade GMPc et favorisant une vasodilatation localisée. L’absorption digestive varie selon la forme utilisée, comprimés classiques ou gels oraux. La distribution tissulaire est large et la liaison protéique élevée, avoisinant 96 %. La métabolisation hépatique génère un métabolite actif contribuant à l’effet pharmacologique global. La demi-vie reste courte, avec disparition plasmatique en quelques heures. Les interactions significatives concernent surtout les nitrés organiques et inhibiteurs puissants du CYP3A4. Dans les publications techniques, kamagra en ligne est souvent cité dans le cadre d’analyses comparatives portant sur les différences de formulations et de cinétique d’absorption.
Frb battery replacement
DATATRACE® FIELD REPLACEABLE BATTERY PROCEDURES
The Field Replaceable Battery for Micropack III Tracers allows the user to change the Lithium batteryof the unit without the necessity of sending the Tracer to the factory.
This document describes the disassembly, battery installation, and reassembly for the FRB Micro-pack. Also included, is a “QUICK-START” procedure which can be used by experienced users as aquick review of the detailed procedures.
While the procedures for changing the battery is simple and straight forward, adherence to theseprocedures is necessary to protect the Tracer from damage.
Please note that replacement of the battery does not automatically recalibrate the Tracer. Normalcalibration procedures should be instituted to have each Tracer factory calibrated at least once eachyear or in conformance with your in-house procedures. CAUTION:
Caution needs to be paid to the handling, storage, and disposal procedures of Lithium batteries. The appropriate procedures are described in this chapter. Follow these instructions completely. Variations to this procedure could damage the battery, or DATATRACE® equipment, and/or causeoperator injury. Note carefully the battery warning labels on the batteries or battery trays anddisposal of spent batteries must comply with local regulations.
The batteries used in the DATATRACE® equipment are specially designed for this application. USE ONLY BATTERIES SUPPLIED BY DATATRACE®. Trying to use any other lithium batterywill void the DATATRACE® equipment warranty and could damage DATATRACE® equipment. FRB MICROPACK TRACER QUICK-START BATTERY CHANGE:
Use this “Quick-Start” procedure if you are already familiar with the DATATRACE® Battery changingprocedure. While the fundamentals are reviewed here, it is strongly recommended that you read theentire procedure in this chapter before attempting to change a battery or disassemble and reassembleyour Tracers for the first time. Refer to Figure 2.
1. Starting with a clean and dry Tracer, loosen the battery cover with the Tracer Grippers
by twisting the cover counterclockwise.
3. Remove the old battery by lifting straight out. Dispose of the battery
4. Examine the battery compartment and threads.
5. Replace the O-ring and repair any damaged components before reassembly.
6. Place a fresh, preconditioned battery in the battery compartment, taking care to put the
“+” battery terminal into the “+” socket. Press the battery into the sockets until seated. Do not twist or turn the battery as it is installed.
7. Apply silicone grease to the O-ring and threads.
8. Install the battery cover by rotating it in a clockwise direction. Only tighten finger tight.
Wipe away any excess silicone grease that may have been pressed out during closure.
9. Perform the Test Tracer procedure to assure the battery is functioning properly, the electronics are reset correctly, and the Tracer is initialized.
Your Tracer is now ready for continued use. FRB MICROPACK BATTERY REPLACEMENT PROCEDURE:
DATATRACE® Micropack Tracer FRB Model(s)
Disassembly of the FRB model Micropack for battery change is a simple and straight forward proce-dure. However, care must be taken that these procedures are followed completely to avoid equipmentdamage or personal injury. Refer to Figure 2.
We recommend that the disassembly of the DATATRACE® Tracers take place in a dry, well-lit worksta-tion. The best place for this activity would be close to the location that Tracers are stored and pro-grammed and that Tracer batteries are stored and conditioned. DO NOT USE ANY WRENCHES, PLIERS, VICES, OR ANY OTHER MECHANICAL MEANS TO LOOSEN OR UNSCREW THE TRACER BATTERY COVER. THE TRACER GRIPPER IS ADEQUATE TO OPEN THE BAT- TERY COMPARTMENT. USING ANY OTHER DEVICE MAY DAMAGE THE TRACER AND MAY MAKE REAS- SEMBLY IMPOSSIBLE.
1. Clean and dry the Tracer body completely. Make sure no process residue remains on
the Tracer body that could cause the Tracer to slip from the your grasp during disas-sembly or could contaminate the battery compartment during battery replacement.
2. Grasp the Tracer with the Tracer Gripper in one hand, clasping the base (probe end)
firmly. With your other hand, using the other Gripper, twist the battery cover counter-clockwise.
3. Once loosened, remove the Grippers and the battery cover will unscrew easily.
4. Remove the old battery by lifting straight out. Do not twist or turn the battery while
5. Dispose of the battery appropriately per local regulations. DO NOT TRY TO RECHARGE,
DISASSEMBLE, OR INCINERATE THE BATTERY.
6. Examine the battery compartment for any signs of contamination, pay particular atten-
tion to the battery socket area. If any contamination is found, remove it, and clean thearea with a dry cloth.
7. Examine the threads of both the battery cover and Tracer body for damage and clean-
liness. If the threads show any damage (e.g., cross threading or “burrs”), do not con-tinue with this procedure. Loosely reassemble the Tracer and return it to the factory forrepair. Exploded View of Micropack III
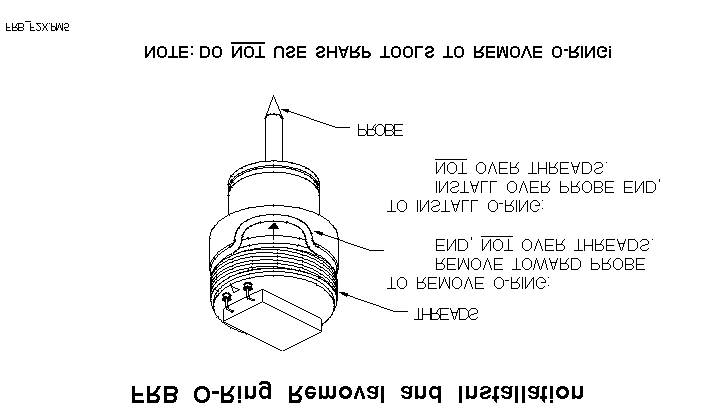
8. Remove the old O-Ring. Refer to Figure 3. DO NOT USE O-RINGS THAT APPEAR
DAMAGED. LEAKS COULD RESULT THAT MIGHT DAMAGE THE TRACER AND/OR SHORTEN BATTERY LIFE.
9. Clean any residue and grease from the threads and adjacent areas including the O-
Ring groove on the Tracer body with a clean, lint-free cloth.
You are now ready to reassemble the Tracer with a new battery.
We strongly recommended that you do NOT leave Tracers unassembled. Damage to components could occur making your Tracers unusable.
Battery installation and assembly of the FRB model Micropack after battery change is simple andstraightforward. However, care must be taken that the procedure is followed completely to avoid equip-ment damage. DO NOT USE ANY WRENCHES, PLIERS, VICES, OR ANY OTHER MECHANICAL MEANS TO SCREW ON OR TIGHTEN THE TRACER BATTERY COVER. THE TRACER GRIPPER IS ADEQUATE TO CLOSE AND SEAL THE BATTERY COMPARTMENT IF ALL PROCEDURES ARE FOLLOWED. USING ANY OTHER DE- VICE MAY DAMAGE THE TRACER AND MAY MAKE IT UNUSABLE.
1. Obtain a fresh, conditioned battery. (See conditioning procedure in the next section.)
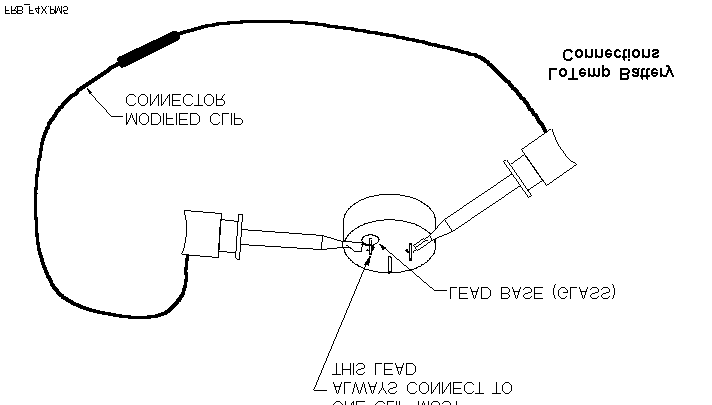
Verify that the temperature range of the FRB Tracer and battery you plan to install are matched. Standard Temp batteries are rectangular and can be used in FRB Tracers with a WHITE or RED ring. LoTemp batteries are disk-shaped and should only be used in Tracers with a BLUE ring.
Standard Temp batteries (rectangular) and LoTemp batteries (round) have different pin configu-rations. The FRB Tracer sockets for Standard Temp and LoTemp Tracers are designed to ac-commodate only the appropriate batteries. So mixing up batteries and sockets is unlikely.
2. Holding the Tracer in one hand and the battery in the other, align the battery pins in the
3. Press the battery into the sockets until seated. This does not take much pressure. Do
not twist or turn the battery as it is installed, as damage to the battery pins or Tracersockets could result.
Your battery installation is now complete. All that remains for you to do is reassemble the Tracer. The reassembly procedure, if followed completely, will seal the battery compartment, maintaining the wa- terproof and pressure-tight seal, as well as the intrinsically safe rating. Always replace the O-ring when the Tracer battery compartment has been opened.
1. Before you replace the O-Ring, apply a thin coat of silicone vacuum grease (in Mainte-
Use a very small amount of grease on your thumb and index finger.
Place the O-Ring between these two fingers and gently pull the O-Ring throughthe grease until a light coating of grease completely covers the surface of theO-Ring.
2. Carefully place the O-Ring in the O-Ring groove at the bottom of the Tracer body
threads. Refer to Figure 3. Avoid dragging the O-Ring across the threads, they couldcut or nick the O-Ring, compromising it’s sealing capability.
The best method of O-Ring installation is to start from the probe side and place one part of the O-Ring in the O-Ring groove. Slightly stretch the O-Ring with your fingers to position it completely over the O-Ring groove, then release it. DO NOT STRETCH THE O-RING ANY MORE THAN NECESSARY. DO NOT DE- FORM THE O-RING.
3. When the O-Ring is seated in the O-Ring groove, use the O-Ring Tool from the O-Ring
Kit to make sure it is not twisted or has become damaged during installation. Do notuse any sharp tools with O-Rings.
4. Place the battery cover squarely over the Tracer body threads. Begin to screw the
cover in a clockwise direction. Be careful to not cross thread the cover on the Tracerbody threads. The cover should screw on smoothly and easily until the O-Ring be-comes engaged.
5. Grasp your Tracer in one hand, clasping the base (probe end) firmly. With your other
hand, twist the battery cover clockwise until the O-Ring seems to disappear.
Never tighten the battery cover more than finger tight. Never use anything to tightenthe Tracer Battery Cover except the Tracer Gripper. Over tightening can cause dam-age to your Tracer cover threads resulting in possible leakage which may damage yourTracer. The design of the Tracer seal is not dependent on high torque to provide aneffective seal.
6. With a clean, dry cloth, wipe away any excess Silicone Vacuum Grease that may have
been pressed out during closure. Silicone can become extremely slippery in combina-tion with water and could cause the Tracer to slip from your hand and be damaged.
The reassembly process is now complete and your Tracer(s) is now ready for use in your process. Following reassembly, always perform the Test Tracer procedure. This will assure that the battery is functioning properly, the electronics are reset correctly, and the Tracer is initialized. FRB MICROPACK BATTERY PRECONDITIONING:
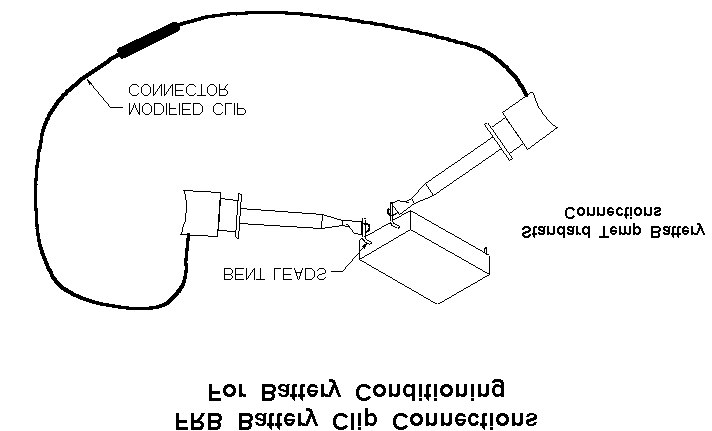
DATATRACE® Modified Battery Clip Connectors
Battery conditioning is a simple, straightforward procedure. We recommend that conditioning ofDATATRACE® Batteries take place at a dry, well-lit workstation, just prior to installation in your Tracer. The best place for this activity would be close to the location that Tracers are stored and programmed,Tracer batteries are replaced, and Tracers are assembled and disassembled.
Each set of DATATRACE® Modified Battery Clip Connectors can prepare one battery at a time forinstallation into your Tracers. It is best to have as many Battery Clip Connectors available for theconditioning process as the number of batteries needed for replacement.
Batteries should be installed into Tracers within eight (8) hours of the conditioning procedure. Prepareonly enough batteries for the current session of battery replacements.
Remember that replacement of the battery does not automatically recalibrate the Tracer. Normalcalibration procedures should be instituted to have each Tracer factory calibrated at least once eachyear or in conformance with your in-house procedures.
The batteries used in the DATATRACE® equipment are specially designed for this application. USE ONLY BATTERIES SUPPLIED BY DATATRACE®. Using any other lithium battery will voidthe DATATRACE® equipment warranty and could damage DATATRACE® equipment.
We recommend that you do not try to condition batteries at the same time you are disassembling andreassembling your Tracers. It is very easy to confuse old batteries with new ones and you mightreinstall an old battery into your Tracer by mistake.
1. Clear an area at your workstation to accommodate your DATATRACE® Batteries you
will need to prepare. Do not take any more batteries from their container than youintend to use at this session. Do not allow the battery pins of one battery to contact those of another. This will cause a short which could damage the battery.
2. Connect the Battery Clip Connectors to the battery terminals as indicated in Figure 4. It
makes no difference which connector is attached to which of the indicated terminals.
3. The normal conditioning process takes 3 to 3.5 minutes. Allow the battery to lie undis-
4. Remove the Battery Clip Connectors from each battery and allow the battery to “sit” for
approximately one (1) minute before installation into a Tracer.
The batteries are now ready for installation into your Tracers.
La Voz de Galicia. El diario más leído de Galicia gracias a la participa. http://www.lavozdegalicia.es/SSEE/print.jsp?idContenido=00031281. Viernes 13 de agosto del 2010 Rimonabant, un medicamentopara perder peso, acarreaproblemas psiquiátricosUna investigación revela que la medicina aumenta el riesgo dedesarrollar graves problemas psiquiátricos, y que en algunospacientes se dieron vario
El acoso laboral y la reforma laboral de México del 2012 Uno de los puntos sobresalientes de la reforma laboral, que se ha anunciado con gran orgullo, es la protección que ésta otorga a los trabajadores para fenómenos laborales que les afectan, tal es el caso del acoso laboral. A finales del año 2012, se adicionó a la Ley Federal del Trabajo, entre otros, un artículo en específico:
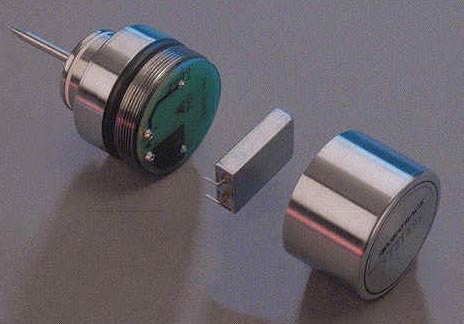

 Exploded View of Micropack III