Le sildénafil présent dans Kamagra exerce une inhibition réversible de la PDE5, modulant la cascade GMPc et favorisant une vasodilatation localisée. L’absorption digestive varie selon la forme utilisée, comprimés classiques ou gels oraux. La distribution tissulaire est large et la liaison protéique élevée, avoisinant 96 %. La métabolisation hépatique génère un métabolite actif contribuant à l’effet pharmacologique global. La demi-vie reste courte, avec disparition plasmatique en quelques heures. Les interactions significatives concernent surtout les nitrés organiques et inhibiteurs puissants du CYP3A4. Dans les publications techniques, kamagra en ligne est souvent cité dans le cadre d’analyses comparatives portant sur les différences de formulations et de cinétique d’absorption.
Unknown
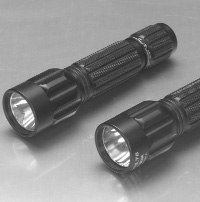
Instructions For TacStar T6 Tactical (6V Xenon) • T6 Tactical LED • T6 Baton (6V AA) Built for Police, Military, Security Forces, Emergency Services and other ProfessionalsIntroduction These compact flashlights produce an ultra bight beam by using Xenon and LED bulb technology. They are designed for easy one hand opera- tion and are equipped with a dual-mode switch for constant-on or momentary-on use. The rugged bodies are manufactured by high precision CNC machines using aircraft-grade aluminum alloy for long lasting durability. The submersible flashlights, including the tail switches, are designed to be water resistant in normal use. The lamp assembles are pre-focused at the factory to generate a light beam with precise focus. To Insert Batteries 1. Remove the tail switch by turning counterclockwise until it detaches from the rear of the flashlight body. 2. Insert two CR-125A 3-volt lithium batteries (for T6 Xenon and T6 LED) or four 1.5-volt AA batteries (for the T6 Baton). For the T6 Xenon and T6 Baton, insert batteries “+” end towards the head. For the T6 LED, insert batteries “-” end toward the head.
3. Reinstall the tail switch on the rear of the flashlight by turning clockwise. Operation 1. CONSTANT-ON: Turn the tail switch clockwise until the light is ON. Be sure that the lamp assembly and the head assembly are fully tightened on the front end of the body. 2. MOMENTARY-ON: Turn the tail switch counter-clockwise approximately 1⁄4 to 1⁄2 turn until the light goes off. Press the rubber button on the end of the tail switch to turn on the light and release the button to turn it off. 3. SAFETY LOCKOUT: Turn the tail switch counter-clockwise approximately 1⁄2 turn further to prevent the rubber button from functioning. This prevents the light from accidentally being turned on. Storage Remove the batteries from the flashlight if it will not be used for an extended period of time. Replacement of Lamp Assembly T6 Xenon: 1. Check to be sure that the tail switch is turned to the OFF position. 2. Remove the head assembly by turning counter-clockwise until it detaches from the body. 3. Remove the lamp assembly by turning the knurled bulb assembly counter-clockwise until it detaches from the body. 4. Install a new lamp assembly by turning clockwise until it is fully seated into the body. 5. Reinstall the head assembly by turning clockwise until it is fully seated on the body. T6 Baton: 1. Check to be sure that the tail switch is turned to the OFF position. 2. Remove the front lens section of the head assembly (just in front of the large grooved section) by turning counter-clockwise until it detaches from the head assembly. 3. Lift out the bulb assembly. Instructions For
4. Place a new bulb assembly into the head assembly. 5. Reinstall the front lens section onto the head assembly by turning clockwise until it is fully seated. TacStar Tactical T6 LED: Flashlights
One of the main advantages to the LED design is its extreme life versus a traditional bulb design. It will rarelyneed to be replaced. If a replacement is ever needed, unscrew the entire LED head assembly by turning count-
T6 Tactical (6V Xenon)
er-clockwise. Reinstall a new head assembly by turning clockwise. T6 Tactical LED General Care and Maintenance T6 Baton (6V AA)
1. Clean the o-rings and o-ring grooves with a soft clean cloth regularly to ensure that the seals are free of dirt. 2. Lubricate the o-rings by applying a light coat of clear silicon grease regularly. 3. Remove the tail switch and clean the threads on the body and inside of the tail switch with a soft clean cloth. Warning Batteries can explode or cause burns if shorted, disassembled, recharged or exposed to fire or high temperature. Handle with care. The flashlights produce a great deal of heat. Be sure that the flashlight is off when stored in a container or pocket. If air cannot circulate around the flashlight to dissipate heat, the flashlight can overheat and cause dam- age to itself or surrounding material, possibly even causing a fire. Specifications Bulb: high pressure Xenon or LED Battery Life: Approximately one hour for Xenon bulb. Approximately 90 minutes for LED. Bulb Life: Approximately 10 hours for Xenon. Indefinite for LED. Batteries: 3 volt CR-123A, DL-123A or other equivalent Lithium for T6 Tactical and T6 LED. Parts and Availability Replacement parts and accessories are available directly from Lyman and selected distributors. These include the following: T6 Tactical Xenon bulb assembly: Item #1081377
3-Volt Lithium Battery (2 Pack): Item #1081372PSEC Only (Pressure Switch End Cap) (Also can be used on Surefire 6P): Item #1081206
(Includes barrel mounts and hardware to mount on most guns): Item #1081481
TacStar is a division of Lyman Products Corp.
475 Smith Street, Middletown, CT 06457 1-800-423-9704 fax: 1-860-632-1699
INFEKTIOLOGIE Die Vogelgrippe – eine ernstzunehmende Gefahr für den Mens XDie Vogelgrippe ist eine schwere und hoch ansteckende Viruskrankheit, mit der sich Men-schen bislang nur schwer infizieren können. Das H5N1-Virus gilt jedoch als schnel verän-derbar, sodass die Besorgnis steigt, dass sich durch eine mögliche Mutation des Erregers Menschen auch untereinander anstecken könnte
I nostri laboratori di base sono specializzati in: ESAMI DI LABORATORIO Di seguito gli esami di laboratorio eseguiti “in house” 17 CHETOSTEROIDI 17 OH CORTICOSTEROIDI A.C.E. Ab ANTI FOSFOLIPIDI IgG Ab ANTI FOSFOLIPIDI IgM Ab ANTI- IA2 Ab ANTI RIBOSOMI Ab ANTI TRANSGLUTAMINASI IgG Ab ANTI-ADENOVIRUS Ab ANTI-B2 GLICOPROTEINA I IgG Ab ANTI-B2 GLICOPROTEINA I IgM Ab ANTI-BARTONELLA H.IgG
 Instructions For TacStar